Gluten-free and Dairy-Free Challah
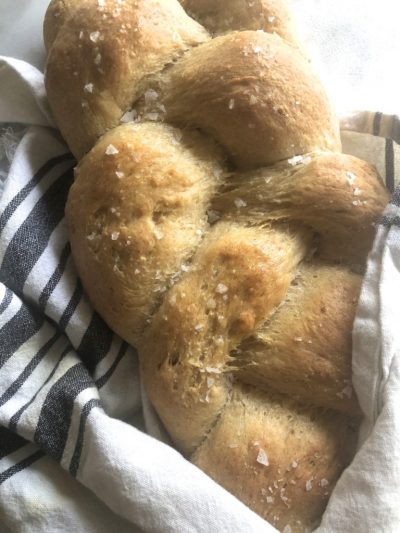
A gluten-free and dairy-free challah you can braid! This recipe is so fun to make, and is absolutely delicious to eat. Enjoy braiding this into a three or 4 strand challah, or a round challah for Rosh Hashanah.
Ingredients
- 480 grams480 grams480 grams Gluten-Free All-Purpose Flour - Primal Palate, 4 cups spooned and leveled

- 108 grams108 grams108 grams Granulated White Sugar, 1/2 cup

- 1 tsp1 tsp1 tsp Himalayan Pink Salt, fine salt

- 1 cup1 cup1 cup Oat Milk, Organic, warmed to 110 degrees

- 1 Tbsp1 Tbsp1 Tbsp Granulated White Sugar

- 2 tsp2 tsp2 tsp Active Dry Yeast
- 2 whole2 whole2 whole Eggs, at room temperature
- 1/4 cup1/4 cup1/4 cup Extra Virgin Olive Oil

- 2 tsp2 tsp2 tsp Psyllium Husk, Ground
- 1 whole1 whole1 whole Egg, plus 1 tablespoon water for egg wash
- 1 Tbsp1 Tbsp1 Tbsp Poppy Seeds
Buy Ingredients on the FoodSocial Market
Shop over 3500 products from unique and independent, creator-curated brandsProcess
Note, these instructions are written assuming the standard serving size, since you have modified the number of servings, these steps may need to be modified for best results
- In the bowl of your stand mixer, combine the gluten-free flour, granulated cane sugar, and salt. Using the paddle attachment, mix on low speed to combine the ingredients together.
- In a glass liquid measuring cup, heat the oat milk for 45 seconds in the microwave, or on the stovetop in a saucepan until it reaches 110 degrees F.
- Whisk the sugar and yeast into the warm oat milk to dissolve the yeast into the warm liquid. Allow the yeast to proof for 5 minutes.
- Add the eggs and olive oil to the dry mix in your stand mixer, and beat on medium speed to combine. At this point you will have a crumbly dough. Scrape down the sides of the bowl.
- Whisk in the psyllium husk powder into your yeast mixture, and then pour the yeast mixture into the bowl of your stand mixer being sure to scrape all of the liquid from the glass measuring cup into your dry mix, and beat on medium speed to combine.
- Once the dough starts to come together, scrape down the sides of the bowl, being sure there isn't any dough stuck to the bottom of the bowl.
- Beat the dough on medium speed until the dough becomes whipped and fluffy, about 5 minutes.
- Transfer the dough to a proofing bucket with a lid, seal with the lid, and allow to proof for 1 hour at room temperature.
- After the dough has proofed on the counter at room temperature, place it in the fridge overnight for 12 hours, or up to 3 days.
- On baking day, prepare a clean work surface and dust with flour.
- Turn the dough out onto your work surface, and dust the top of the dough with flour. Knead the dough until you form a smooth ball. Use a flexible bowl/bench scraper to assist you if your dough starts to stick to the work surface, and dust the work surface with more flour.
- Press the dough down to flatten it, and using your bench scraper, divide the dough into 3 equal portions. This doesn't need to be precise, you can eyeball the size.
- Place a sheet of parchment paper next to your work surface so that you can place the dough strands onto the parchment once they are rolled out.
- Roll out each portion of dough into long strands, approximately 15 inches in length. Once one strand is rolled out, place it on the sheet of parchment, and follow with the rest.
- Press the top of the strands together, and gently braid the three strands together. It's best to almost drape them over each other and give some room for proofing, since this dough does not contain gluten, it is at risk for tearing as it grows.
- Tuck the ends of the strands under the loaf just slightly, and gently press the loaf together from the ends if you have a lot of spacing in the braid.
- Transfer the challah on the parchment to a baking sheet.
- Whisk together an egg and 1 tablespoon of water for your egg wash, and brush the entire loaf of challah with the egg wash.
- Spray a sheet of plastic wrap with avocado oil spray, and place the oiled plastic wrap over the challah, and let it rise again for 45 minutes to 1 hour, brushing with egg wash 2 more times during that 45 minutes to 1 hour.
- Preheat your oven to bake at 350 degrees F.
- Once you the challah has proofed for 45-60 minutes, gently smooth any cracks you may see in the strands when you do your last egg wash. It is normal for this dough to crack as it expands, and sealing up those cracks before baking will help the challah from cracking deeper in those areas while it bakes.
- Sprinkle the top of the challah with poppy seeds if desired, and place in the center of the oven to bake for 30 minutes at 350.
- After 30 minutes, turn the temperature down to 325, and bake for an additional 25 minutes, or until the challah reads 200 degrees F in the center of the loaf.
- Remove from the oven, and allow to cool before slicing.
Add a Note
My Notes:
About This Recipe
Show nutritional information
Baked Goods Coconut Free Dairy Free FODMAP Free Gluten Free Nut Free Pescetarian Shellfish Free Sugar Alcohol Free Vegetarian| This is our estimate based on online research. | |
| Calories: | 251 |
| Fat: | 8 g |
| Carbohydrates: | 41 g |
| Protein: | 2 g |
| Cholesterol: | 0 g |
| Sodium: | 243 mg |
| Fiber: | 0 g |
| Sugars: | 14 g |
| Sugar Alcohol: | 0 g |
| Calculated per serving. | |








Leave a Reply
You must be logged in to post a comment.