Gluten-Free Goat Cheese, Tomato, and Sautéed Onion Puff Pastry Tart
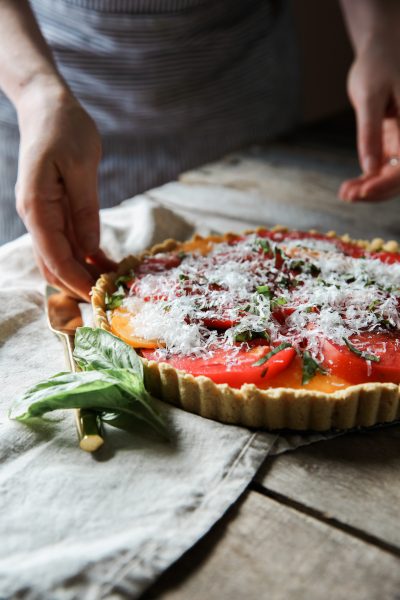
This recipe is the flakiest, most tender gluten-free puff pastry using the rough puff method. It comes together quickly, and can be used to make savory or sweet pastry! I used this pastry to make a delicious savory tart with goat cheese, tomatoes, sautéed onion, our Herb Garden Seasoning, and fresh parm and basil. It is sure to wow any guests, but I promise it's a dish you wont want to share!
Ingredients
- 240 grams240 grams240 grams Gluten-Free All-Purpose Flour - Primal Palate, 2 cups spooned and leveled

- 1 Tbsp1 Tbsp1 Tbsp Milk Powder, Non-Fat
- 1 Tbsp1 Tbsp1 Tbsp Granulated White Sugar, fine sugar

- 1/2 tsp1/2 tsp1/2 tsp Xanthan Gum
- 1/2 tsp1/2 tsp1/2 tsp Himalayan Pink Salt, fine salt

- 160 grams160 grams160 grams Butter, Unsalted - Kerrygold, or other European style, high fat butter
- 14 Tbsp14 Tbsp14 Tbsp Water, ice water
- 6 oz6 oz6 oz Goat Cheese, crumbled
- 1.5 cups1.5 cups1.5 cups Tomato, Cherry, sliced

- 1 whole1 whole1 whole Onion, sliced
- 1 Tbsp1 Tbsp1 Tbsp Extra Virgin Olive Oil

- 1/2 tsp1/2 tsp1/2 tsp Little Palates Herb Garden Seasoning - Primal Palate

- 1 tsp1 tsp1 tsp Kosher Flake Salt - Primal Palate

- 1/2 tsp1/2 tsp1/2 tsp Black Pepper

- 2 Tbsp2 Tbsp2 Tbsp Parmesan Cheese, grated

- 2 Tbsp2 Tbsp2 Tbsp Basil, Fresh, sliced

Tart toppings
Buy Ingredients on the FoodSocial Market
Shop over 3500 products from unique and independent, creator-curated brandsProcess
Note, these instructions are written assuming the standard serving size, since you have modified the number of servings, these steps may need to be modified for best results
- Whisk together the gluten-free flour, milk powder, sugar, xanthan gum, and salt. Pour the dry mix into a freezer safe container, and chill in the freezer until use.
- Weigh 160 grams of butter, and then divide the butter into a 40 gram portion and a 120 gram portion.
- Be sure that your butter is cold, and chop the 40 gram portion into small chunks. You can also grate this with a cheese grater.
- Thinly slice the 120 gram portion into small thin squares. If you were to cut a stick of butter in half, and then slice those halves, that is the size you are looking for.
- Place the 40 gram portion of butter in a small bag or container, and place the 120 gram portion of thin slices of butter onto a small plate, and cover. Place both portions of prepared butter in the freezer for 1 hour.
- Once your butter is very cold, and your flour is also very cold, you can start making the puff pastry dough.
- Prepare a glass measuring cup with cold filtered water, and add some ice. You will also need a tablespoon and a fork, a large sheet of plastic wrap, and a rolling pin.
- Pour the cold dry mix of puff pastry into a mixing bowl, and add the 40 gram portion of small pieces of butter.
- Toss the small pieces of butter with the flour, and then start working them into the dough with your finger tips, crumbling the butter throughout the dough.
- Once the butter is crumbled throughout the dough relatively evenly, and you just see a crumbly dough, and do not see any large chunks of butter anymore, you can add the thin slices of butter.
- Add the thin slices of butter to the flour, being sure they are all separated, and coated in flour. If you have any thicker squares of butter, press them with your fingers to flatten them
- Toss the sliced squares of butter throughout the flour.
- Pour 4 tablespoons of ice water over the butter and flour, and start to combine it using a fork.
- Once the 4 tablespoons of ice water are mixed into the flour and butter, add another 4 tablespoons, and mix again with your fork.
- You can add up to 14 tablespoons of ice water to the dough. At 12-14 tablespoons of water your dough should feel more hydrated, and clump together in one mass. How much water you need will depend on the time of year and humidity in your home.
- I prefer this dough to be a bit more hydrated, because gluten-free tends to absorb a lot of liquid, and since we are not working with gluten, it can be more prone to cracks. At this hydration it will work well for the folds.
- Once you have hydrated your flour, and it is now a ball of dough, place it on a sheet of plastic wrap, and fold the sides in to form a square shape, leaving some room to roll the dough once it is sealed in the plastic. I like to do this so I can easily form a square or rectangle of dough that is ready to roll.
- Once the dough is sealed up in the plastic wrap, roll it out in the plastic wrap so that it forms a square shape in the plastic wrap. It can be about an inch thick. Place it in the fridge for 30 minutes, or in the freezer for 15.
- Once your dough has chilled, remove it from the fridge or freezer, and liberally dust your work surface with flour. You will want to use a good bit of flour to prevent sticking.
- Liberally dust the surface of the dough, and then using your rolling pin, start stretching it by swiftly whacking the rolling pin down on the dough. I do this by holding the rolling pin horizontally over the dough, and just going down the dough, whacking it to flatten and stretch it. This helps "roll" the dough out with out pressing the cold butter into the flour too much.
- Check to see if your dough needs more flour underneath to prevent sticking, and then once you have added more dusting flour, you can start to roll your dough out. If the sides start to crack, just press them back together. You want to roll your dough out to approximately 6 inches by 15 inches. Press any cracks together along the sides or top, and you can flip the dough over to roll the opposite side as you go to keep things even, and move the dough around to prevent sticking.
- Once you have rolled the dough for the first time, brush any excess flour from the surface of the dough with a pastry brush before your first fold.
- Now you will do your first letter fold. Fold the top third of the dough down, and then brush any excess flour from the top of the dough that was folded down before folding the bottom third over the top third.
- Rotate the dough 90 degrees so that the open sides are now facing top and bottom, and the folded sides are facing out right and left. If you dough is still cold, you can roll it out again using the same technique described above. If it has started to warm up to room temperature, wrap it back up in the plastic wrap and place it in the fridge for 30 minutes, or in the freezer for 15 minutes.
- Once your dough is chilled again, you can roll it out again and do your second letter fold.
- Once you have performed the second letter fold, using the same technique above, you can wrap the dough up to chill again until you plan to use it. If you want to use it right away, just make sure it chills again for 15-30 minutes if it is not still cold.
- While your pastry is chilling again after the final fold, prepare your toppings by crumbling the goat cheese, slicing the tomatoes, and sautéing the sliced onion in butter or oil.
- Once you are ready to shape your dough, place a sheet of parchment paper on your work surface.
- You will want to roll your dough out on a sheet of parchment paper for easy transfer to a baking sheet since this is a large tart.
- Dust your parchment paper with flour, and place your dough onto the parchment paper. Dust the top of the dough with flour, and start rolling it out using the same technique described above of whacking the dough to start softening the butter and stretching the dough. Once the butter has softened from this, you can start rolling it.
- You will want to move your dough around so that you can roll it in an even shape. You will be using the entire pastry dough for this recipe, so you need to roll it out into a large rectangle shape.
- I roll mine out to be about 1/4 inch thick. It does not have to be perfect for this tart.
- After your dough is evenly rolled out, you can use a knife or pastry wheel to cut any uneven edges, or form a straight border.
- Now you can start topping the dough with the filling. You can use a fork to "dock" the inside to prevent the inside from puffing up too much, but you don't have to do this.
- Sprinkle the crumbled goat cheese in an even layer over the pastry, leaving about 1 inch border for the crust. It is okay if the goat cheese does not cover all of the surface area of the pastry. It can be spaced out a bit.
- Top the goat cheese with your sautéed onion, and then the sliced tomatoes.
- Sprinkle the toppings with the Herb Garden Seasoning, Kosher Flake Salt, and black pepper.
- Brush the border of the dough with water, and then fold in each side to form a crust.
- Drizzle the olive oil over the entire pastry, and then you can season the crust with a little extra salt and pepper if desired.
- Preheat your oven to bake at 425 degrees F.
- Transfer the parchment paper to a baking sheet, cover, and place in the fridge for 30 minutes.
- Once your pastry has chilled again for 30 minutes, remove it from the fridge, and place it in the oven to bake for approximately 35 minutes, or until puffed, and golden on the edges.
- Remove from the oven, and immediately grate parmesan cheese over the entire tart, and sprinkle the sliced basil over the top.
- Allow to cool, then cut into squares and enjoy.
Add a Note
My Notes:
About This Recipe
Show nutritional information
Baked Goods Coconut Free Egg Free Gluten Free Nut Free Pescetarian Shellfish Free Sugar Alcohol Free| This is our estimate based on online research. | |
| Calories: | 155 |
| Fat: | 7 g |
| Carbohydrates: | 18 g |
| Protein: | 4 g |
| Cholesterol: | 20 g |
| Sodium: | 345 mg |
| Fiber: | 1 g |
| Sugars: | 3 g |
| Sugar Alcohol: | 0 g |
| Calculated per serving. | |













Leave a Reply
You must be logged in to post a comment.